Insulated siding repair tips are crucial for maintaining your home’s exterior and energy efficiency. Understanding the different types of damage, from minor cracks to significant water intrusion, is the first step in effective repair. This guide provides a comprehensive overview of assessing damage, selecting appropriate repair materials, and executing repairs safely and efficiently, ultimately extending the life of your siding.
Whether you’re tackling a small crack or replacing a damaged panel, proper technique is key to a successful and long-lasting repair. We’ll explore various repair methods, emphasizing preventative maintenance and safety precautions to ensure your project is completed correctly and without incident. From identifying the source of water damage to choosing the right sealant, this guide offers practical advice for homeowners of all skill levels.

Identifying Damage to Insulated Siding
Insulated siding, while durable, is susceptible to various types of damage over time. Regular inspection is crucial for early detection and timely repairs, preventing more extensive and costly problems down the line. Understanding the common types of damage and how to assess their severity will help homeowners effectively maintain their property’s exterior.
Identifying damage involves a systematic visual inspection of the entire siding surface. This process requires careful observation and attention to detail to spot even minor imperfections. Early detection of problems can significantly reduce the scope and cost of necessary repairs.
Common Types of Insulated Siding Damage
Insulated siding can be damaged in several ways, including cracks, gaps, water damage, and impact damage. Cracks can appear as hairline fractures or larger splits in the siding panels. Gaps can develop between panels, allowing moisture intrusion. Water damage manifests as discoloration, swelling, or rotting of the siding material. Impact damage, often caused by flying debris or accidental collisions, can result in dents, punctures, or broken sections. These issues can significantly impact the energy efficiency and aesthetic appeal of your home.
Inspecting for Cracks, Gaps, and Water Damage
A thorough inspection should begin at the bottom of the house and proceed upwards, examining each panel closely. Use a ladder to reach higher areas and ensure good visibility. Look for any cracks, however small, paying particular attention to areas where panels join. Check for gaps between panels, measuring their width with a ruler. Inspect for signs of water damage, such as discoloration, staining, or swelling of the siding material. Feel the siding for any softness or sponginess, indicating potential water damage beneath the surface.
Assessing the Severity of Siding Damage
Assessing damage severity involves evaluating the extent and nature of the damage. Minor cracks or small gaps may require only simple caulking or sealant. More extensive cracks or significant gaps might necessitate panel replacement. Water damage should be addressed promptly to prevent further deterioration. The severity of impact damage depends on the extent of the damage. Small dents might be repairable, while larger holes or broken sections require panel replacement.
Comparison of Insulated Siding Damage Types and Causes
| Damage Type | Description | Causes | Severity |
|---|---|---|---|
| Cracks | Hairline fractures or larger splits in the siding. | Settlement, temperature fluctuations, impact. | Minor to severe, depending on size and location. |
| Gaps | Spaces between siding panels. | Improper installation, settling, expansion and contraction. | Minor to moderate, depending on size and moisture intrusion. |
| Water Damage | Discoloration, swelling, or rotting. | Cracks, gaps, improper flashing, leaks. | Moderate to severe, depending on extent of damage. |
| Impact Damage | Dents, punctures, or broken sections. | Flying debris, accidental collisions. | Minor to severe, depending on extent of damage. |
Repairing Minor Insulated Siding Damage
Minor damage to insulated siding, such as small cracks and holes, can often be repaired effectively with readily available materials and a bit of patience. Addressing these issues promptly prevents further damage from moisture and improves the overall aesthetic appeal of your home. This section details methods for repairing these common problems.
Crack Repair
Small cracks in insulated siding are typically caused by expansion and contraction due to temperature fluctuations. Repairing these involves cleaning the crack thoroughly, applying a flexible sealant, and then painting to match the existing siding. For instance, a hairline crack could be effectively sealed with a high-quality acrylic latex caulk. Apply the caulk smoothly, ensuring it fills the crack completely, and then use a damp finger or putty knife to smooth the surface. Allow the caulk to cure completely according to the manufacturer’s instructions before painting.
Hole Repair
Holes in insulated siding, whether from impact or other damage, require a more involved repair process. The size of the hole dictates the repair method. Small holes, less than an inch in diameter, can often be patched using a specialized siding patching compound. This compound, typically available at home improvement stores, is designed to adhere to the siding and provide a durable, weather-resistant seal. Larger holes might require cutting a section of replacement siding and adhering it securely using construction adhesive and fasteners. After the patching compound or replacement siding is fully cured, the area should be carefully primed and painted to match the surrounding siding.
Surface Preparation for Repair
Before applying any repair materials, it’s crucial to thoroughly prepare the damaged area. This involves cleaning the surface with a brush and soapy water to remove any dirt, debris, or loose paint. Allow the area to dry completely before proceeding with the repair. If the damaged area shows signs of rust or corrosion, these must be addressed prior to patching, using a wire brush and rust remover as needed. Proper surface preparation ensures that the repair material adheres properly and provides a lasting fix.
Matching Paint and Caulk
Achieving a seamless repair often hinges on matching the paint and caulk to the existing siding. For small repairs, obtaining a sample of the existing paint and having it color-matched at a paint store is ideal. If the original paint is unavailable, selecting a similar color from the paint store’s color charts is a viable alternative. When selecting caulk, choose a color that closely matches the siding. If an exact match is difficult, selecting a neutral color, such as white or beige, may be a better option to avoid creating an obvious patch. Remember to allow sufficient drying time before exposing the repaired area to rain or extreme temperatures.
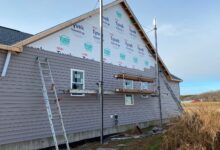
Replacing Damaged Insulated Siding Panels
Replacing a damaged insulated siding panel requires careful execution to maintain the integrity of your home’s exterior. This process involves removing the old panel, preparing the area, and installing a new one, ensuring a seamless and weatherproof finish. Proper technique is key to avoiding further damage and ensuring a long-lasting repair.
Tools and Materials Required for Siding Panel Replacement
Gathering the necessary tools and materials beforehand streamlines the replacement process. Having everything readily available minimizes interruptions and ensures a smooth workflow.
- Measuring tape
- Utility knife or reciprocating saw
- Pry bar or flathead screwdriver
- Hammer
- Caulk gun
- Safety glasses
- Work gloves
- Replacement insulated siding panel (matching existing color and style)
- Exterior-grade sealant or caulk
- J-channel (if needed for edge replacement)
- Nails or screws (appropriate for siding type)
Removing the Damaged Siding Panel
Careful removal of the damaged panel prevents further damage to surrounding areas. Start by assessing the extent of damage to determine the best approach.
- Begin by carefully prying the damaged panel away from the adjacent panels, starting at one edge. Use a pry bar or flathead screwdriver, inserting it gently between the panels to avoid cracking the siding. Work slowly and methodically to avoid damage.
- Once a small section is loosened, continue working your way along the edges of the panel. Be mindful of the underlying sheathing and avoid excessive force that could cause damage.
- Once the panel is sufficiently loosened, carefully remove it from the wall. Inspect the area behind the removed panel for any underlying damage to the sheathing or framing.
- If necessary, repair any underlying damage before proceeding to the installation of the new panel.
Installing the New Siding Panel
Precise cutting and fitting of the new panel ensures a proper seal and a professional-looking finish. Accurate measurements are crucial for a successful installation.
- Measure the dimensions of the opening created by removing the damaged panel. Ensure accurate measurements to ensure the new panel fits correctly.
- If necessary, cut the new panel to fit the opening using a utility knife or reciprocating saw. Make sure to use a sharp blade for a clean cut. For curved cuts, a jigsaw might be necessary.
- Apply a bead of exterior-grade sealant or caulk to the back of the new panel, along the edges and around any fasteners.
- Carefully slide the new panel into place, aligning it with the adjacent panels. Ensure it is properly seated and flush with the surrounding siding.
- Secure the new panel using nails or screws, following the manufacturer’s recommendations. Avoid over-driving the fasteners, which could damage the siding.
- Apply additional caulk to seal any gaps between the new panel and the surrounding siding. This helps prevent water intrusion.
Flowchart Illustrating the Panel Replacement Process
The following flowchart visually represents the steps involved in replacing a damaged insulated siding panel.
Start -> Remove Damaged Panel -> Inspect Underlying Structure -> Repair Underlying Damage (if needed) -> Measure Opening -> Cut New Panel (if needed) -> Apply Sealant -> Install New Panel -> Secure New Panel -> Apply Final Sealant -> End
Addressing Water Damage in Insulated Siding
Water damage behind insulated siding is a serious issue that can lead to significant structural problems and costly repairs if left unaddressed. It compromises the insulating properties of the siding, potentially causing energy inefficiency and mold growth. Prompt identification and remediation are crucial to minimizing long-term damage.
Potential Causes of Water Damage Behind Insulated Siding
Several factors can contribute to water intrusion behind insulated siding. These include faulty installation, damaged flashing around windows and doors, cracks in the siding itself, clogged gutters and downspouts leading to water overflow, and even poor landscaping that directs water towards the foundation. Improper caulking or sealant around penetrations like vents or pipes can also allow water to seep through. In some cases, severe weather events like heavy rainfall or hurricanes can overwhelm even properly installed siding systems.
Locating and Repairing Leaks Behind Insulated Siding
Locating the source of a leak requires careful inspection. Start by examining the exterior of the siding for visible cracks, gaps, or damaged areas. Check caulking and sealant around windows, doors, and other penetrations. Look for signs of water staining on the interior walls, particularly near the baseboards or around windows and doors. If a leak is suspected, a thorough inspection of the attic or crawl space may be necessary to assess the extent of the water damage. Repairing leaks involves addressing the identified source, whether it’s resealing cracks, replacing damaged flashing, or repairing damaged gutters. This often requires removing sections of siding to access the affected area, then carefully reinstalling it after the repair.
Drying Out Affected Areas and Preventing Mold Growth
Once the leak is repaired, the next step is to thoroughly dry the affected area. This might involve using dehumidifiers, fans, and opening windows to promote air circulation. It’s crucial to remove any standing water and to monitor the moisture levels using a moisture meter. To prevent mold growth, it’s essential to ensure the area is completely dry before reinstalling any siding. Mold remediation might be necessary if significant mold growth has already occurred. This often involves professional cleaning and the use of anti-fungal treatments. Proper ventilation is also critical in preventing future mold problems.
Checklist for Addressing Water Damage in Insulated Siding
A systematic approach is vital when dealing with water damage. The following checklist summarizes the essential steps:
- Inspect the exterior siding for visible damage.
- Check caulking and sealant around all penetrations.
- Examine interior walls for signs of water staining.
- Locate the source of the leak (this may require accessing the attic or crawl space).
- Repair the leak (replace damaged flashing, reseal cracks, etc.).
- Thoroughly dry the affected area using dehumidifiers and fans.
- Monitor moisture levels with a moisture meter.
- Address any mold growth with appropriate remediation techniques.
- Reinstall siding once the area is completely dry.
- Implement preventative measures to avoid future water damage.
Maintaining Insulated Siding
Proper maintenance is key to extending the lifespan of your insulated siding and preserving its aesthetic appeal. Neglecting regular care can lead to premature deterioration, costly repairs, and reduced energy efficiency. By following a simple maintenance schedule, you can significantly increase the longevity of your investment.
Regular cleaning and inspection are crucial for identifying and addressing potential problems early on. Early detection of issues such as cracks, dents, or water damage allows for timely intervention, preventing more extensive and expensive repairs down the line. Furthermore, consistent cleaning prevents the buildup of dirt, grime, and mildew, which can compromise the siding’s structural integrity and appearance.
Protecting Insulated Siding from Extreme Weather
Extreme weather conditions, including intense sun exposure, freezing temperatures, and strong winds, can significantly impact the condition of insulated siding. Prolonged exposure to harsh sunlight can cause fading and discoloration, while freezing temperatures can lead to cracking and expansion issues. Strong winds can dislodge panels, creating vulnerabilities to water damage. Protective measures are necessary to mitigate these risks. For example, regular inspection for loose or damaged panels is crucial. If any are found, they should be repaired or replaced promptly to prevent further damage. Consider using appropriate sealants to protect seams and joints from water intrusion. During periods of extreme cold, consider adding extra insulation to vulnerable areas, particularly around windows and doors, to prevent expansion and contraction stresses on the siding.
Recommended Maintenance Tasks and Frequency
Regular maintenance tasks are vital for preserving the integrity and appearance of insulated siding. The following schedule outlines recommended actions and their frequency:
- Annual Inspection: A thorough visual inspection of the entire siding surface, checking for cracks, dents, loose panels, and signs of water damage. This should be conducted in spring or fall to identify issues before extreme weather sets in.
- Semi-Annual Cleaning: Washing the siding with a gentle detergent and water solution to remove dirt, grime, and mildew. Avoid using high-pressure washers, as they can damage the siding. A soft-bristled brush or sponge should be used.
- As-Needed Repairs: Addressing any identified damage promptly. This may involve minor repairs, such as caulking cracks or replacing damaged panels. Larger repairs should be handled by a qualified professional.
- Seasonal Preparation: Inspecting and preparing for extreme weather. This might involve sealing gaps and cracks before winter, or providing extra protection during harsh summers. For example, using sun-reflective paint can help reduce the impact of direct sunlight.
Choosing the Right Repair Materials
Selecting the appropriate repair materials is crucial for a successful and long-lasting insulated siding repair. The wrong choice can lead to further damage, unsightly repairs, and ultimately, costly replacements. Careful consideration of material properties and compatibility with your existing siding is essential.
Choosing the correct caulking, sealant, or patching compound depends on several factors, including the type and extent of the damage, the material of your siding, and the environmental conditions. A durable, weather-resistant material is key to ensuring the repair holds up against the elements.
Types of Caulking, Sealants, and Patching Compounds
Different caulking, sealants, and patching compounds offer varying levels of flexibility, adhesion, and weather resistance. Acrylic latex caulks are a popular choice for their ease of use and paintability, suitable for smaller gaps and cracks. Silicone caulk provides superior water resistance and is ideal for areas exposed to significant moisture. Polyurethane sealants offer excellent adhesion and durability but require more precise application. Patching compounds, often epoxy-based, are designed to fill larger holes and damaged areas, providing a strong and lasting repair.
Factors to Consider When Selecting Repair Materials
Several factors influence the selection of appropriate repair materials. Color matching is crucial for a seamless repair, especially with visible damage. Durability ensures the repair withstands weathering, impact, and temperature fluctuations. Weather resistance is paramount, particularly for exterior applications, protecting the repair from moisture, UV radiation, and extreme temperatures. Material compatibility with your existing siding is essential for proper adhesion and longevity. For instance, a sealant designed for vinyl siding might not adhere well to aluminum siding.
Examples of Suitable Materials for Various Types of Damage
| Type of Damage | Suitable Material | Reasoning |
|---|---|---|
| Small cracks and gaps | Acrylic latex caulk | Easy to apply, paintable, provides good adhesion for minor imperfections. |
| Larger holes and damaged sections | Epoxy patching compound | Strong, durable, provides a solid base for further repair or replacement. |
| Water penetration around windows or doors | Silicone caulk or polyurethane sealant | Excellent water resistance, forms a long-lasting seal to prevent further moisture intrusion. |
| Seam separation | Polyurethane sealant | High adhesion and flexibility, suitable for bridging gaps and filling joints. |
Safety Precautions for Insulated Siding Repair
Insulated siding repair, while seemingly straightforward, involves potential hazards requiring careful attention to safety. Failing to prioritize safety can lead to serious injury or even death. This section details crucial safety measures to ensure a safe and successful repair project.
Working at heights and with power tools necessitates adherence to strict safety protocols. Ignoring these precautions can result in falls, cuts, electric shocks, or other severe injuries. Proper planning and the consistent use of personal protective equipment (PPE) are paramount.
Working at Heights
Working on ladders or scaffolding presents significant fall risks. Always use a ladder that extends at least three feet above the roofline and ensure it’s placed on a stable, level surface. Never overreach while on a ladder; instead, reposition the ladder to access the work area. Consider using a safety harness and lanyard attached to a secure anchor point for added protection when working at significant heights. For larger projects, scaffolding offers a more stable and safer working platform. Ensure scaffolding is properly assembled, leveled, and secured according to manufacturer instructions.
Power Tool Safety
Power tools, such as saws, drills, and nail guns, pose cutting, crushing, and impact hazards. Always use tools in good working condition, with properly sharpened blades and bits. Before operating any power tool, carefully read and understand the manufacturer’s instructions and safety precautions. Wear appropriate PPE, including safety glasses or a face shield, hearing protection, and work gloves. Maintain a firm grip on the tool and keep your body clear of the cutting or moving parts. Never force a tool; let it do the work at its designed speed. Disconnect the power tool before changing blades or bits or performing any maintenance.
Personal Protective Equipment (PPE)
Personal Protective Equipment (PPE) is crucial for mitigating risks during insulated siding repair. This includes safety glasses or a face shield to protect your eyes from flying debris; hearing protection (earplugs or muffs) to reduce noise-induced hearing loss from power tools; work gloves to protect your hands from cuts and abrasions; and a dust mask or respirator to prevent inhalation of dust and harmful particles. When working at heights, a safety harness and lanyard are essential. Appropriate footwear with good traction is also necessary to prevent slips and falls.
Hazard Mitigation
Several hazards are associated with insulated siding repair, including falls, electrical shocks, cuts, and exposure to hazardous materials. To mitigate these risks, always disconnect electrical power to the area before working near electrical wiring or outlets. Use caution when handling sharp objects like knives or utility blades. Be aware of overhead power lines and maintain a safe distance. If working with asbestos-containing materials, hire a qualified professional for removal and disposal. Properly dispose of all waste materials according to local regulations.
Safe Work Practices Illustrated
Imagine a worker repairing a damaged insulated siding panel on a two-story house. The worker is wearing a safety harness attached to a securely anchored rope on the roof. They are using a sturdy, properly positioned extension ladder. They have donned safety glasses, work gloves, and hearing protection. Before using the power drill to install the replacement panel, they have carefully checked the tool’s condition and ensured the area is free from electrical hazards. They are methodically and carefully performing the repair, taking breaks as needed to maintain focus and avoid fatigue. The worker maintains a three-point contact on the ladder at all times. After completing the repair, they carefully descend the ladder and properly stow their tools and equipment.
Final Conclusion
Maintaining your insulated siding is an investment in your home’s value and energy efficiency. By understanding the common types of damage, employing the correct repair techniques, and prioritizing preventative maintenance, you can significantly extend the life of your siding and protect your home from the elements. Remember to always prioritize safety and consult with a professional if you’re unsure about any aspect of the repair process. With the right knowledge and approach, you can confidently tackle most siding repairs and keep your home looking its best.