Insulated siding installation cost is a significant investment for homeowners, impacting both aesthetics and energy efficiency. Understanding the various factors influencing this cost, from material selection to labor expenses, is crucial for budgeting and project planning. This guide provides a comprehensive overview of the process, empowering homeowners to make informed decisions and avoid unexpected expenses.
From choosing the right material—vinyl, fiber cement, or metal—to navigating contractor selection and understanding labor rates, this exploration covers all aspects of insulated siding installation. We’ll delve into the intricacies of cost breakdowns, maintenance considerations, and potential challenges to ensure a smooth and successful project. By the end, you’ll have a clear understanding of what to expect and how to manage your budget effectively.
Factors Influencing Insulated Siding Installation Cost
Several key factors contribute to the overall cost of installing insulated siding on a home. Understanding these variables allows homeowners to make informed decisions and better manage their budgets. These factors encompass material selection, labor expenses, regional price differences, and the specific characteristics of the house itself.
Labor Costs
Labor costs represent a significant portion of the total installation expense. The hourly rate for skilled siding installers varies regionally and depends on factors such as experience, demand, and the prevailing wage in the area. More complex installations, requiring specialized skills or extensive preparation work, will naturally command higher labor costs. For example, a project involving intricate trim work or significant removal of existing siding will likely necessitate more labor hours and thus a higher overall cost. Furthermore, the size of the installation crew and the efficiency of their work will also impact the final labor bill. Larger crews might complete the project faster, but this doesn’t always translate to lower costs, as you are paying for more workers simultaneously.
Material Costs
The type of insulated siding chosen dramatically affects the material costs. Vinyl siding is generally the most affordable option, while fiber cement and metal siding command higher prices due to their superior durability and aesthetic qualities. Material costs are also influenced by the chosen color and texture; premium colors and unique textures often carry a price premium. The quantity of materials required, dictated by the home’s size and complexity, is another significant factor. For instance, a large two-story house will naturally need considerably more siding materials than a small bungalow. Finally, the cost of additional materials like flashing, trim, and fasteners should also be considered.
Regional Variations
Regional variations in labor rates, material availability, and local regulations heavily influence the overall cost. Areas with a high cost of living or a shortage of skilled labor will typically see higher installation prices. Similarly, the accessibility of specific siding materials in a given region can also impact cost. If a particular type of siding is not readily available locally, transportation and handling costs can add to the final expense. Local building codes and permitting requirements can also add to the overall project cost, with some areas having more stringent regulations than others.
Siding Material Cost Comparison
| Material Type | Average Cost per Square Foot | Range | Influencing Factors |
|---|---|---|---|
| Vinyl | $3-$8 | $2-$12 | Thickness, color, texture, style |
| Fiber Cement | $8-$15 | $6-$20 | Thickness, color, texture, brand, installation complexity |
| Metal | $10-$20 | $8-$30 | Gauge, material type (aluminum, steel), color, finish, installation complexity |
Home Size and Complexity
The size and complexity of the home significantly impact the installation cost. Larger homes require more materials and labor, directly increasing the expense. Complex architectural features, such as multiple gables, dormers, or intricate trim work, add to the labor time and material requirements, thus raising the overall cost. For example, a home with many angles and curves will require more precise cuts and extra labor compared to a home with simple, straight lines. Homes with extensive existing damage or requiring significant preparation work, such as the removal of old siding or the repair of underlying sheathing, will also increase the total cost.
Unexpected Costs
Homeowners should anticipate unexpected costs during the installation process. These might include unforeseen damage discovered during the removal of old siding, requiring additional repairs. Problems with the underlying structure, such as rotted wood or insect infestation, may necessitate costly repairs before siding installation can commence. Permitting fees and inspections can also be more expensive than initially anticipated, particularly if revisions are needed. Finally, changes in the scope of the project, such as adding extra features or upgrading materials mid-installation, will naturally increase the overall cost.
Material Costs for Insulated Siding
Choosing the right insulated siding material significantly impacts the overall cost of your project. Several factors contribute to the price, including the material itself, its quality, the brand reputation, and any additional features. Understanding these variations is crucial for making an informed decision that aligns with your budget and long-term goals. This section will compare and contrast the cost-effectiveness of various insulated siding materials, highlighting price fluctuations and the advantages and disadvantages of each.
Vinyl Insulated Siding Costs
Vinyl siding is generally the most affordable option for insulated siding. Prices typically range from $3 to $12 per square foot, depending on the thickness, color, and texture. Higher-end vinyl siding, featuring enhanced durability and realistic wood grain textures, will fall towards the higher end of this range. Basic, single-color options tend to be cheaper. Brand reputation also plays a role; well-known manufacturers often command a slightly higher price due to perceived quality and warranty offerings.
Fiber Cement Insulated Siding Costs
Fiber cement siding is a more durable and fire-resistant option compared to vinyl, but comes at a higher price. Costs generally range from $8 to $20 per square foot, influenced by thickness, color, texture, and brand. Fiber cement siding that mimics the look of wood or stone will be pricier than standard options. Premium brands with longer warranties will also contribute to higher costs. The added cost is often justified by its superior longevity and resistance to damage from weather and pests.
Metal Insulated Siding Costs
Metal insulated siding, typically made of aluminum or steel, offers excellent durability and longevity. Prices range from $10 to $30 per square foot or more, depending on the type of metal, finish (e.g., painted, powder-coated), and gauge (thickness). Aluminum tends to be slightly more expensive than steel but offers superior corrosion resistance. Custom colors and finishes further increase the cost. The higher upfront cost is often balanced by the material’s exceptional lifespan and low maintenance requirements.
Cost and Longevity Comparison of Insulated Siding Materials
Understanding the long-term cost-effectiveness requires considering both the initial investment and the lifespan of each material. The following bullet points summarize the advantages and disadvantages of each material type in terms of cost and longevity:
- Vinyl:
- Advantages: Low initial cost, wide variety of colors and styles, relatively easy installation.
- Disadvantages: Shorter lifespan compared to other options (15-30 years), can fade or become brittle over time, susceptible to impact damage.
- Fiber Cement:
- Advantages: High durability and longevity (50+ years), fire-resistant, low maintenance.
- Disadvantages: Higher initial cost, heavier and more difficult to install than vinyl, can be susceptible to cracking if not properly installed.
- Metal:
- Advantages: Extremely durable and long-lasting (50+ years), fire-resistant, low maintenance, resistant to insects and rot.
- Disadvantages: Highest initial cost, can dent, susceptible to scratches, may require special handling during installation.
Labor Costs for Insulated Siding Installation
Labor costs represent a significant portion of the overall expense for insulated siding installation. Understanding the factors that influence these costs is crucial for accurate budgeting and project planning. These costs are not standardized and vary widely depending on several key elements.
Several factors contribute to the hourly or project-based rates charged by siding installers. These include the installer’s experience and skill level, their geographic location, and the complexity and scope of the project itself. Additional factors, such as the time of year and demand, can also play a role.
Factors Affecting Labor Rates
Installer experience directly correlates with labor costs. Highly skilled and experienced installers, possessing a proven track record and expertise in handling complex installations, command higher hourly or project rates than less experienced individuals. For example, an installer with 15 years of experience specializing in intricate designs might charge $75-$100 per hour, while a less experienced installer might charge $40-$60 per hour. Location significantly impacts labor costs. Areas with a high cost of living, such as major metropolitan areas or regions with a high demand for skilled labor, typically have higher labor rates than rural areas. A project in New York City might have labor costs 50% higher than a similar project in a rural area of the Midwest. Finally, the project scope greatly influences labor costs. A large-scale project involving significant preparation work, intricate detailing, or complex installation techniques will naturally require more labor hours and thus, higher costs compared to a smaller, simpler project. A complete house siding replacement will inherently cost more in labor than replacing siding on a small shed.
Typical Labor Costs per Installation Phase
The following table illustrates typical labor costs associated with different phases of insulated siding installation. These are estimates and can vary based on the previously mentioned factors.
| Installation Phase | Labor Cost per Square Foot (USD) | Notes |
|---|---|---|
| Preparation (removal of old siding, surface preparation) | $1.50 – $3.00 | This can vary significantly based on the condition of the existing siding and the complexity of removal. |
| Installation of new siding | $2.00 – $4.00 | This cost is influenced by the type of siding, the complexity of the design, and the installer’s experience. |
| Cleanup and finishing | $0.50 – $1.00 | This includes disposal of waste materials and final site cleanup. |
Preparing for Insulated Siding Installation
Proper preparation is crucial for a successful and long-lasting insulated siding installation. Failing to adequately prepare the surface can lead to issues like poor adhesion, premature failure of the siding, and ultimately, costly repairs down the line. This section outlines the necessary steps, tools, and considerations for preparing your home for this significant exterior improvement.
Preparing your home involves a multi-step process that begins with a thorough inspection of the existing exterior walls. This assessment will identify any necessary repairs or treatments before the new siding is installed. The goal is to create a smooth, clean, and stable surface that provides a secure base for the new insulated siding.
Surface Preparation
Thorough surface preparation is paramount for a successful insulated siding installation. This involves removing any loose or damaged materials, repairing any imperfections, and cleaning the surface to ensure proper adhesion. Failure to adequately prepare the surface can lead to significant problems later on. For example, unaddressed rotted wood will compromise the integrity of the new siding and could lead to water damage and mold growth.
The steps involved include removing old siding, caulking, and trim. Any damaged wood or other underlying materials must be repaired or replaced. This may involve patching holes, replacing rotted sections of wood, or addressing any structural issues. Once repairs are complete, the surface should be cleaned to remove any dirt, debris, loose paint, or other contaminants that could interfere with adhesion. A pressure washer can be effectively used for this, but care should be taken to avoid damaging the underlying structure. After cleaning, the surface should be allowed to dry completely before proceeding to the next stage.
Necessary Tools and Equipment
Having the right tools and equipment readily available will streamline the installation process and ensure a professional finish. A lack of proper tools can lead to delays, increased labor costs, and potentially a less-than-perfect installation.
Essential tools include: measuring tapes, levels, saws (circular saw, hand saw), drills, screwdrivers (both Phillips and flathead), safety glasses, work gloves, ladders, a utility knife, and possibly a caulking gun. Depending on the type of siding and the complexity of the project, additional tools may be required. For example, if removing old vinyl siding, a pry bar might be necessary. For intricate trim work, a miter saw may prove more efficient. Power tools significantly speed up the process, but manual tools may be necessary for finer details or in hard-to-reach areas.
Safety Precautions
Safety should always be the top priority during any home improvement project. Insulated siding installation involves working at heights, using power tools, and handling potentially hazardous materials.
Always wear appropriate safety gear, including safety glasses, work gloves, and sturdy footwear. When working at heights, use a stable ladder and ensure it is properly positioned. Never overload a ladder and always maintain three points of contact. Power tools should be used with caution and according to the manufacturer’s instructions. Proper ventilation should be maintained when working with any potentially hazardous materials. If unsure about any aspect of the installation, consult a professional contractor.
The Installation Process
Insulated siding installation is a multi-step process requiring precision and attention to detail to ensure a durable, energy-efficient, and aesthetically pleasing outcome. Proper preparation and adherence to best practices are crucial for a successful installation.
The installation process typically begins with careful preparation of the existing wall surface. This involves removing any old siding, repairing damaged areas, and ensuring a clean, level substrate. Then, the installation of the insulated siding panels themselves follows a specific sequence, often starting at a corner or a designated starting point and proceeding in a systematic manner, typically horizontally or vertically depending on the siding type and manufacturer’s instructions. Proper fastening and attention to overlaps are critical for weather resistance.
Preparing the Wall Surface
Prior to installing insulated siding, the existing wall surface must be thoroughly inspected and prepared. This includes removing any old siding, trim, or flashing. Damaged areas of the wall sheathing should be repaired or replaced to ensure a level and stable base for the new siding. Loose or deteriorated caulking or sealant should be removed and replaced with a suitable weather-resistant material. Any exposed wood should be treated with a primer or sealant to protect against moisture damage. Finally, the surface should be cleaned of debris and dust to ensure proper adhesion of the new siding.
Installing the Insulated Siding Panels
Once the wall is prepared, the installation of the insulated siding panels can begin. This typically involves starting at a corner or a designated starting point, aligning the first panel according to the manufacturer’s instructions. Subsequent panels are then installed, ensuring proper overlap and alignment with the previous panel. Each panel is fastened securely using appropriate fasteners, taking care to avoid over-tightening, which could damage the panels. The use of a level is essential to maintain consistent alignment and a professional appearance. Expansion and contraction of the siding due to temperature changes should be considered, allowing for appropriate gaps as per manufacturer specifications.
Addressing Potential Installation Challenges
Several challenges can arise during insulated siding installation. Uneven wall surfaces can make it difficult to maintain consistent alignment and may require additional shims or furring strips to create a level base. Damaged or improperly installed panels may need to be replaced. Weather conditions, such as extreme heat or cold, can affect the installation process and the adhesion of the siding. Working around existing features, such as windows and doors, requires careful measurement and cutting to ensure a clean and professional finish. Proper planning and the use of appropriate tools and techniques can mitigate many of these challenges. For instance, using a laser level can significantly improve accuracy in alignment, and having a variety of shims available allows for precise adjustments on uneven surfaces.
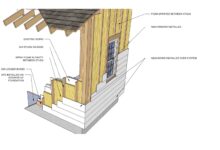
Installing Trim and Flashing
Proper installation of trim and flashing is crucial for ensuring watertightness and protecting the underlying structure. Flashing should be installed around windows, doors, and other penetrations in the wall to prevent water from entering. Trim pieces are then installed to cover the edges of the siding and provide a finished appearance. All joints and seams should be carefully sealed with a high-quality sealant to prevent water infiltration. Flashing should extend beyond the edges of the siding and be properly sloped to direct water away from the wall. The trim should be securely fastened and aligned to create a neat and professional finish. Careful attention to detail during this phase of the installation is essential to prevent future water damage. Visualize a meticulous application of flashing, overlapping layers to create a barrier against rain and snow, and trim pieces seamlessly integrated with the siding, creating a clean, sharp edge. The sealant acts as a final barrier, creating a waterproof seal at every joint.
Finding and Selecting Contractors
Choosing the right contractor is crucial for a successful insulated siding installation. A reputable contractor ensures quality workmanship, adherence to timelines, and proper handling of any potential issues. Careless selection can lead to costly repairs, aesthetic flaws, and significant project delays.
Selecting a qualified and reputable siding contractor involves a multi-step process that prioritizes thorough research and careful comparison. This process minimizes the risk of encountering unqualified or unreliable contractors and ensures a smooth and satisfactory installation.
Contractor Research and Qualification Verification
Finding qualified contractors begins with thorough research. Start by seeking recommendations from friends, family, and neighbors who have recently had siding installed. Online resources such as the Better Business Bureau (BBB) and Angie’s List can provide valuable insights into contractors’ reputations, including customer reviews and complaint histories. Check for licensing and insurance; a valid license demonstrates compliance with local regulations, while insurance protects you from liability in case of accidents or damages during the installation process. Verifying these credentials helps ensure the contractor operates legally and responsibly. Furthermore, investigating the contractor’s experience with insulated siding specifically is vital. Look for a proven track record and a portfolio showcasing their past work.
Obtaining and Comparing Multiple Quotes
It’s essential to obtain at least three detailed quotes from different contractors. These quotes should break down the costs of materials, labor, and any other associated expenses. Comparing these quotes allows for a comprehensive understanding of the pricing variations and helps identify any potentially unrealistic or inflated bids. Ensure that all quotes are based on the same scope of work to facilitate accurate comparison. Discrepancies in the specifications of the quotes can lead to misinterpretations and inaccurate cost comparisons. For instance, one contractor might include underlayment while another doesn’t, affecting the overall cost. Thorough review of each quote’s detailed breakdown prevents this issue.
Key Questions to Ask Potential Contractors
Before committing to a contractor, it’s crucial to ask specific questions to assess their professionalism and expertise. Inquire about their experience with insulated siding installations, their process for handling unforeseen problems, and their warranty policies. Clarify their payment schedule and project timeline to avoid surprises. Asking about their insurance coverage and licensing ensures protection and compliance. Furthermore, requesting references and contacting previous clients to inquire about their experiences provides valuable firsthand feedback. Examples of pertinent questions include: “Can you provide references from recent insulated siding projects?”, “What is your process for handling material damage or unexpected issues during installation?”, and “What type of warranty do you offer on your workmanship and materials?”. These questions help ascertain the contractor’s reliability and commitment to quality work.
Maintenance and Lifespan of Insulated Siding
Insulated siding, while offering superior energy efficiency and durability compared to traditional siding, still requires regular maintenance to ensure its longevity and continued performance. The lifespan and necessary upkeep vary depending on the material used and the environmental conditions the siding faces. Understanding these factors is crucial for maximizing your investment and avoiding costly repairs down the line.
Proper maintenance significantly impacts the lifespan of your insulated siding. Neglecting routine checks and cleaning can lead to premature deterioration and reduce the overall lifespan of the material. This section will outline expected lifespans for various types and the best practices for maintenance to extend their useful life.
Expected Lifespan of Different Insulated Siding Types
The lifespan of insulated siding is heavily influenced by the material used. Vinyl insulated siding, for instance, typically boasts a lifespan of 20-40 years with proper care. Fiber cement siding, known for its exceptional durability, can last 50 years or more, often outperforming other materials. Aluminum siding, while relatively low-maintenance, might only last 20-30 years depending on exposure to the elements. Wood siding, even when insulated, has a shorter lifespan, usually ranging from 15-30 years, requiring more frequent maintenance due to its susceptibility to rot and insect damage. These estimates, however, are influenced by factors such as climate, installation quality, and the frequency of maintenance. For example, a vinyl siding installation in a harsh coastal environment might experience premature fading and degradation compared to the same installation in a milder inland climate.
Routine Maintenance for Insulated Siding
Regular cleaning is the cornerstone of insulated siding maintenance. At least twice a year, a gentle cleaning with a soft brush and a mild detergent solution is recommended. This removes dirt, grime, and mildew buildup, preventing damage and preserving the siding’s appearance. Power washing should be avoided as it can damage the siding’s surface, especially for softer materials like vinyl. Inspect the siding regularly for any signs of damage, such as cracks, loose panels, or insect infestations. Addressing minor issues promptly prevents them from escalating into more significant and costly repairs. For example, a small crack left unattended could allow water penetration, leading to rot or mold growth.
Potential Problems and Solutions
Several issues can affect the longevity of insulated siding. One common problem is water damage, often manifested as discoloration or swelling of the siding panels. This usually stems from improper installation, allowing water to seep behind the siding. The solution involves identifying and repairing the leak, followed by allowing the affected area to dry completely. In severe cases, replacement of damaged panels may be necessary. Another potential issue is the growth of mold or mildew, particularly in humid climates or areas with poor ventilation. Regular cleaning, as previously mentioned, helps prevent this. However, if mold has already taken hold, a solution of bleach and water (following manufacturer’s recommendations) can be used for cleaning, followed by thorough rinsing. Finally, insect damage can affect wood insulated siding. Regular inspections and prompt treatment with appropriate insecticides are crucial to prevent extensive damage and maintain the siding’s integrity. Imagine a small hole appearing in a wood panel; this might be a sign of wood-boring insects. Addressing this immediately prevents further infestation and structural damage.
Closing Notes
Ultimately, the cost of insulated siding installation is a multifaceted equation. Careful planning, informed material selection, and diligent contractor vetting are essential for a successful project that delivers both aesthetic appeal and long-term energy savings. By understanding the factors discussed here, homeowners can confidently navigate the process, ensuring their investment aligns with their budget and expectations. Remember to factor in unexpected costs and prioritize thorough research to achieve the best possible outcome.